Pages

Our Featured Items for Sale on Etsy

Thursday, December 10, 2015

Restoration of a 1937 Emerson Mod. 149 Two Band Radio

This project was started December 2015.  It was evident from the start that this would be a challenging restoration.  The radio was completely dead, the chassis pretty rusty, and lots of deterioration evident in the wiring.

The 3 piece case is bakelite and was originally unpainted dark brown.  This model came in two styles: brown, like this one, and a black model with a cream colored plaskon center. Although the paint job looks good in the picture, it's not that great...just a spray can job with no attempt to rub it out or otherwise make it look nice.  Also, I don't like that it is a 'fantasy' color, never available on this radio. Also, the celluloid dial face is broken and the foil number plate wrinkled.  I have a new dial cover so the only issue will be repair of the dial face.

One of the decision to be made is to strip the case and return it to its original single color, or, using period appropriate colors, paint it to emulate the fancier black and cream model.  I'll let the radio decide as we proceed with bringing life to it.


December 10, 2015

Examination of the chassis has been done. The tubes have been tested showing the rectifier to be dead and the power tube weak.  I replaced the rectifier and the tubes now all light and there is some sound in the speaker but no reception. Some significant oscillation indicate shielding issues.  The next step will be to test the various stages.  There is a schematic available in my Rider Troubleshooting Manual Vol VIII. These are harder to work with than the Sam's Photofacts because the author assumes the reader knows what he's doing. For me, that means I'll have to create my own circuit diagrams to figure out the resistances and pin voltages. Oh well...I'll eat some brain food and give it a go....

Tuesday, July 14, 2015

Restoration of a 1947 Black Emerson Moderne

Emerson Mod 522 Ebony AM Table Radio ~ c. 1947
This is a post-war Emerson Model 522 which is a very popular collectible AM table radio. It was manufactured for the 1947 model year and featured unique styling in a heavy duty bakelite case with a clear plastic dial lens. The Model 522 was available only in an unpainted ebony bakelite case. The dial is lighted by a small bulb centered above the dial lens and the numbers and pointer were designed so that each number on the dial looks as if it is individually lit.

The mid 1940's to early 1950's incorporated a design style known as 'Moderne' and was characterized by modern but somewhat bulbous elements.  Examples of Moderne styling were very evident in the look of the 1950 and 1951 Chrysler and General Motors automobiles as well as much of the dark wood furniture of the period.  While the Moderne school of design was short-lived (primarily because it was fundamentally ugly), a few successes such as this Loewy inspired radio survived and viewed in retrospect are really quite beautiful and collectible.

The Emerson here was acquired a few months ago and in as-found original condition with the possible exception of the power cord having been replaced. In order to complete the circuit for testing, I also had to replace the burned out pilot light. It is an early model as the chassis uses the older Loctal type tubes. Later 511's and 522's incorporated the miniature tubes.
The case, front grill and tuning lens

Tubular cap upper left
A careful application of minimal electrical power to the circuitry showed that there were lots of problems.  The radio played but with a loud hum, a serious case of motor-boating and very weak reception.  The obvious villain appeared to be the filter capacitor (the big tubular thing in the upper left in the above picture). In addition there were a number of very iffy-looking other paper capacitors that no doubt are contributing to the several performance quality issues. Further evaluation would include checking both the capacitors and resistors to make sure they are within stated tolerances.

I have a schematic for this radio, so the next step was to test the tube pin resistances and pin voltages and compare them to the published specs.  In addition, I wanted to identify those pins that had anomalies in both resistance and voltage as that would be a great clue as to where in the circuit failed or failing components could be located. Below are my sheets showing the initial readings. Those highlighted in pink were out of spec.


Initial Resistance Readings

Initial Pin Voltage Readings
+ highlighted are pins with anomalies
in resistance & voltage
Cosmetically, the radio wasn't too bad.  The case was structurally sound with no cracks or damage and the original knobs, grill, dial lens and bottom plate were all there and in decent but dirty condition. The finish on the case seemed a little dull and given that it's bakelite, restoring shine could be problematic since bakelite can't be sanded and refinished like hard plastics. However, I felt there was good possibility that a good cleaning could bring good results.  The grill might have to be repainted for which I generally use a period appropriate color and paint type.

The radio was taken apart and the process of evaluating the condition of the cosmetics and the electrical components begun. The original power cord was in good shape but had been improperly spliced into the circuit so I completed the repair to correct that and now it is properly installed.

The above analysis strongly indicated that most of the old paper and wax capacitors were at best in marginal to failed condition and because of that,  there was a good chance some of the related resistors had been stressed and were performing outside of spec.  I decided to replace all the affected capacitors and those resistors that could potentially fail. Particular attention was paid to the high value resistors as they tend to vary greatly as they age.

Below is a picture of the (almost) completed work on the chassis...one high value resistor has to be changed and I'm waiting for a supplies order to arrive so I can do that.

New components
The radio now plays really well with strong volume and surprisingly sensitive tuning.  The tube pin voltages are now pretty much in spec except those affected by R21, which will be replaced as soon as the supplies order arrives.

Below is the Voltage Measurement chart updated to this point.  The highlighted numbers are the correlated cap and resistor anomalous readings that should resolve after R21 is replaced.

Updated Pin Voltages

While waiting for parts, I turned to the cosmetics.  The case was thoroughly cleaned with a very gentle solution of dish washing detergent and soft bristle brush.  Bakelite is not like other plastics; you cannot "polish" a dull case as the original shine was baked on and cannot be restored if removed. There are some methods for emulating a bakelite shine, but luckily, I did not have to employ them here.  As it turned out, this case is really nice and the shine was preserved as a soft ebony glow which is what you want with unpainted bakelite. After cleaning and removing a couple of old paint spots, I waxed it with a carnuba based automobile wax. 

The front metal grill was in pretty good shape and I touched up a couple of places that were stained. The dial lens was a little hazy so I used a plastic cleaning compound to clear it up.  The yellow tint is patina and a function of the radio being 77 years old. I don't try to rub out the tint as I think it makes the radio look original and adds to the character. Further, it in no way affects the dial light's ability to individually illuminate the station numbers. 

The picture at the beginning of this article is the finished radio.


©2015 David Simons Big River Mercantile

Wednesday, July 8, 2015

Feedback from our customers

Deco Era Silk Parasol
"This is sublime the most beautiful umbrella I have ever owned"


Sunbeam Mixmaster Stand Mixer


"This item is fabulous, just as described. The mixer is in beautiful condition and works wonderfully. The item arrived promptly and was packaged perfectly. I would not hesitate to purchase from this merchant again. Thank you!"


Victorian Crystal Perfume


"Really quick service. Especially with special shipping requirements. Thanks"


Truetone Radio


"Super rare radio, that sounds great and looks amazing. Extremely Happy with my purchase! Shipping was fast too!"


Depression Era Beater Jar


"packing, fast shipping, item just as described--- Wonderful shopping experience! Thank-you!"


Gold Nugget Pin


"Excellent transaction; beautiful item, fast shipping."

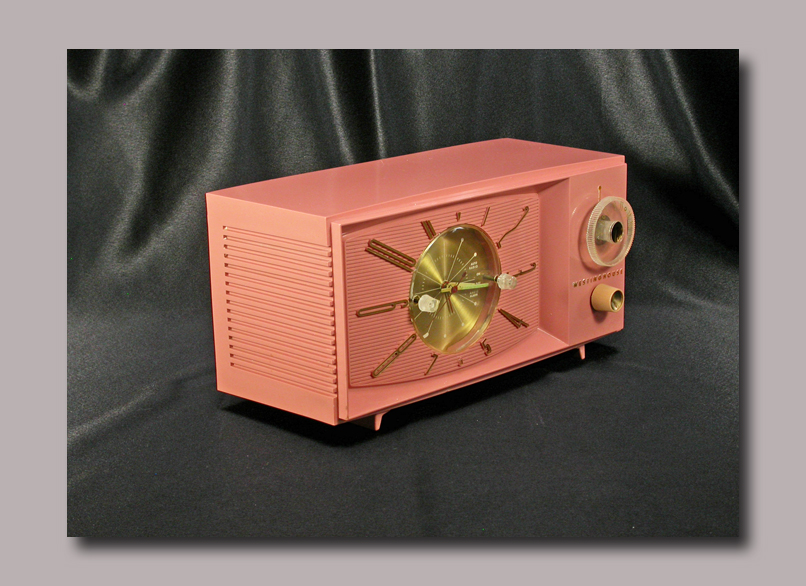
Instructions for the Care and Operation of Your Westinghouse Clock Radio


In the 1950's, there was hardly a home anywhere that didn't have a Westinghouse TV, refrigerator or radio. The 1957 model clock radio was unique in its 'TV' look, and was produced in more or less the same case for the next several years.

The 1957 model is the nicest with its gold tone clock background and really high quality hard plastic case.

These old radios, once restored are reliable and trouble free with just a minimum of care and maintenance.

CARE OF THE CASE

1. Do not place the radio in direct sunlight. Also, make sure the area where the radio is placed is open with plenty of ventilation.  Tube radios generate a fair amount of heat which needs space to dissipate.

2. The high gloss plastic case on this radio is easy to clean. Fingerprints, dust and dirt can easily be removed with a damp cloth and little mild dish washing detergent.  Be sure to rinse any soap residue off the case with a clean wet rag. 

3. DO NOT use any abrasives as they will scratch and damage the plastic. Likewise, solvents and citrus cleaners should not be used.

4. Radios restored in our shop will have a protective coat of carnuba wax applied.  This should last a long while &but if you want to wax it, use a high grade automotive wax with carnuba and NO CLEANERS. The process is identical to waxing a car; apply, let it dry and buff it off,

5. We have found that soft toothbrush is effective in cleaning all the grooves on the speaker side of the radio.  It also works for cleaning gunk out of the knurls on the tuning and volume knobs. If the knobs are incredibly dirty they can be pulled off and soaked in a solution of water and gentle dish detergent.

OPERATING THE RADIO

1. Plug it in and make sure the clock is running.  

2. To turn the radio on, rotate the right hand switch from the 'off' position to the 'on' position.  These are printed on the clock face and the knob has a molded pointer.  

3. The alarm function can be set with these knobs.  Once set, rotate the knob pointer to 'Radio Alarm'. The radio will then come on at the set time.

4. Although these radios can be played for long periods of time, remember they are 60 to 70 years old and are not designed to operate hour after hour.  We recommend no more than 6 hours a day, although it can remain plugged in so the clock operates.


© 2015 Big River Mercantile

Tuesday, July 7, 2015

Instructions for Use & Care of Your Truetone Mod. D2216B Table Radio


Truetone was the in-house brand name for radios made for Western Auto stores. These radios are known for their high quality construction, great sound and unique appearance.

The D2216 B featured is a tube type AM table radio housed in a rich brown bakelite case and manufactured in 1954.  Featuring a combination clock/alarm, this model was distinguished from other radios in its price range by its glass dial lenses, gold tone metal grill and high-end components. Design-wise, it has a traditional look that was popular in that period.

Your radio has been thoroughly evaluated and restored in our shop.  The case is original in all respects and the electrical components updated to assure reliable operation.  

Care and cleaning

1. The bakelite case has a high gloss finish baked on at the factory.  For that reason NEVER use abrasives of any kind or citrus based cleaning products as they will remove the gloss and it cannot be restored.  We recommend a periodic wipe-down of the case every month or so using a soft cloth dampened with plain water.  A microfiber cloth is ok to use.

For a more deep cleaning, use something like mild dishwasher detergent and a soft cloth.  Be sure to use a plain water cloth to remove any soap residue.

2, Generally, these bakelite cases need little or no maintenance other than the normal cleaning and dusting described above.  It is our practice to apply a protective coat of carnuba based wax prior to shipping.  A new coat of wax can be put on after a year or so, if you wish.  DO NOT use any of the wax/cleaners as these contain abrasives which will damage the finish.  We recommend a high quality automotive wax that contains carnuba wax. 

3.  Do not place your radio is direct sunlight as this can damage the bakelite.

4, The radio should be operated at least a couple hours a week. It's ok to leave it plugged in and the clock running.
  a) For their time, these clocks were really good. But they are mechanical and by today's standards cannot be expected to keep perfect time. The clock on this radio is very good and runs quietly. It needs no servicing.

Operating the radio

1. Plug in the radio and using the far left (as you face it) knob, turn it counter-clockwise to the 'on' position. After about 60 seconds, you will hear some light static or crackling in the speaker. 

2. Using the larger knob on the front of the radio, tune it to a station. When the station is loud and clear, the radio is tuned.  The smaller knob controls the volume.

3. The time is adjusted using the knurled knob on the back of the radio.

4. The alarm can be set to either go off as a 'buzz' or turn on the radio at a set time.  Set the time you want it to go off using the right hand clock knob.  When it is set, gently pull the knob out (toward you).  The alarm will then come on at the set time.  

5. There is a snooze knob on the bottom which when rotated, will turn the radio off for a few minutes. 

Our goal is to restore these old radios to as close to their original look and working condition as possible. For more information about our process, please see the article about Louie the old Zenith radio that was posted last year.

© 2015 Big River Mercantile

Sunday, February 16, 2014

The Restoration of Louie, the Zenith Clock Radio


Usually the old radios that find their way to my shop are just old radios; junk that no one else wants and they come in all sizes and shapes and condition. Housed in dirty, bug-infested cases with wiring that often looks like it was used by a rat lynch mob and then eaten, these pieces are usually just inanimate lumps of metal, plastic and wax.

That was my opinion until I started working with Louie, the Zenith radio.
Louie, the 1953 Zenith Clock Radio

Unlike most radios that come into my shop, Louie emanated a certain joie de vivre and looked almost new from the moment he was acquired. Made in 1953 and housed in a beautiful teal green painted bakelite cabinet, this radio was always well cared for and loved for all of its 61 years. Sadly, after the passing of its owner, it had nowhere to go and none of the family cared to keep it. Louie caught my eye immediately at an estate sale. I really liked the color and the boxy early fifties design which reminded me of the DeSotos and Plymouth automobiles of that era. Although I have previously owned and restored the lesser 515 model, this was the first higher end 622 for me.

In the shop, I did a quick evaluation and found the radio worked really well, the clock ran quietly and kept good time, and all the knobs and functions were operational. However, knowing that if no work had been done to the radio over its life, the likelihood of incipient operational issues was high. As a matter of course, I always remove and examine all radio chassis to check the condition of the wiring, the insulation and the critical components. I also test the vacuum tubes with a mutual conductance tube tester. These checks are done no matter how great the radio looks and sounds. Like most things and people at 60+ years, things are starting to wear out and joints get creaky. So even though this radio sounded great, I had concerns about long-term reliability for whomever becomes Louie's new owner.

To start, the chassis was removed from the case. With clock radios, this is a more complex operation as the clock mechanism often has to be taken out in order to remove the chassis far enough from the case to be able to work on it. This is nerve-wracking because those little plastic knobs on the clock have to be removed. Often, a previous repair has resulted in them being glued onto the stems because years of wear and tear make them loose. If that has occurred, it's literally impossible to remove the knobs without some damage. For me, it's hard to tell until I try pulling them off; and, if they're glued, it is not uncommon for the knob to break. If that happens, it's almost impossible to find an exact match replacement. So with heart in hand, I gave them a yank...and off they came, no problemo. Removing the clock assembly after the knobs are off is no more than a matter of removing the hold down screws underneath the cardboard protective backing.

The clock mechanism removed
From the start, Louie made it clear that he didn't think I needed to be messing around with his innards. Since the radio hadn't been opened in over 60 years, I didn't agree. The screws holding the back on were stubbornly stuck as were the two large chassis screws on the bottom. An impatient person would have wrenched those things off, taking bits of bakelite with them and devil take the hindmost. But the cosmetics of this radio are so fine I did not want to chance damage. So with some chiding and negotiating and little WD 40, everything came apart nicely to expose the heart of this fine radio.

Underneath circuitry as found
The first thing to do was to run tests. Almost all American radios made since the 1920's have specs that someone has published. In the early years, it was the Rider manuals, and the Beitman manuals. Later, Sam's Photofact Folders were available. Voltages and resistances within the typical AA5 circuitry are essentially the same from one radio to the next and it's not hard to guess what they should be. But different manufacturers made tweaks to their circuits for specific models and that can sometimes make a difference in how the radio performs. For that reason, I like to find the schematic for the radio I'm restoring in order to most closely approximate the range of specs called for by the original maker. Testing Louie, then, was pretty easy as I had the schematic. With the manufacturer's information, I've devised a form on which I can record the optimal factory specs from the schematic, my test results prior to messing with the chassis and the final specs after I've fixed everything. This form helps me be consistent in the steps I go through in evaluating and renewing these old radios.
My voltage and resistance test form

As it turned out, Louie was not in perfect health. A number of capacitors and resistors had dried up and were not functioning within their required ranges. As a result, a lot of electrical stress was being placed on the vacuum tubes, a good indication that the radio would fail before too long. Clearly, some renovation was in order before putting Louie up for sale.

The necessary replacements were made, all of the solder joints re-soldered and wiring with old insulation replaced.  In addition, a new polarized power cord was added to further assure safety of operation.  With this done, the radio really, really sounded nice.  The volume range was high, the tuning sensitivity excellent and the full fidelity of the radio came booming through the large speaker. It was time to perform the final tests to make sure everything was operating within specifications.

Suddenly, while checking pin voltages on one of the tubes, there was a nasty flash as the pilot light blew out and everything went dead as a door nail.  What the heck had I done?  Was there a short? Were wires touching someplace? What?

There's always a sinking feeling when something like this happens.  Old radios can be mules when it comes to behaving properly. This radio, though, had not demonstrated bad behavior.  Every new component added a layer of quality to its operation, and it seemed as happy as I with the results. So what perverse trick was it playing?
Troubleshooting sheet - Zenith radio

Troubleshooting non-working radios is a study in logic and step by step reasoning.  Since I'm not great at that, I've devised a method and format for uncovering circuit faults. Luckily, in this instance, it turned out that one of the tubes had failed. This was fine since I was replacing all of them anyway.

As soon as the new tube was plugged in, everything returned to normal and the radio sang like a bird (but without the chirps and squeaks that can be annoying in anything but birds)

Now it was time to turn attention to the case.  The paint job after 61 years was in remarkable shape.  No renovation was needed; just cleaning.  The case was cleaned thoroughly inside and out and some of the inner insulating paper glued.  The gold colored grill was cleaned bar by bar and all the knobs done over with a toothbrush.  After it all dried, a coat of protective carnuba wax was applied to everything. The loudspeaker was treated with a special coating I've formulated to restore flexibility and add strength to the speaker paper.

All the components were re-set back in the case, the pointer knob aligned and the clock movement lubricated.
Case parts after cleaning and wax
Although Louie can't talk, he can certainly sing and there's no doubt that whenever you turn on his switch, he couldn't be happier. The warm tube driven AM sound is full and sharp and his little pilot light shines strong and steady for hours and hours.  His clock with the copper motor runs silently and keeps excellent time and all his alarm and radio on-off functions work as they did when he was new.

Through the mid-1950's, Zenith, one of the biggest name in electronics,  made some of the finest consumer radios available. They were colorful, innovative, great sounding and solidly designed pieces that could work anywhere with any decor. Zenith radios were the choice of many radio repairmen.  Louie, the Zenith radio is a great representative of those times.


© David Simons, Feb. 2014

Sunday, September 29, 2013

1975 Alaska Crafted Nugget Jewelry


Sunday, September 22, 2013

Depression Era Green Glass Candlestick Lamp


Friday, September 20, 2013

Snapshot Summary of Major Costume Jewelry Makers

HOBE

A company whose origins go back to 19th Century Paris and its founder, Jacques Hobe, a master goldsmith known throughout Western Europe.  His sons continued the tradition of excellence and one son (also named Jacques), was intrigued with the use of machinery in making jewelry.  His son, William, made the Hobe name famous for its mass-produced yet very elegant costume jewelry.  Jewelry from this era exhibits superior workmanship with stones hand-set and of the highest quality.  Hobe was frequently the jewelry of choice in 1950's Hollywood.

HATTIE CARNEGIE

A Parisian style boutique chain founded in 1918 and selling Carnegie-designed clothing.  The company's namesake, Hattie Carnegie, began manufacturing jewelry to complement the clothing line.  Her boutiques were frequented by the rich and famous, including, among others, Joan Crawford.  Jewelry from this company is highly collectible due to its quality of design and workmanship.

WEISS
Weiss Necklace

Founded in New York City in 1942 by former Coro designer Albert Weiss, this company flourished during the 1950's and 1960's, offering the highest quality jewelry using Austrian crystal rhinestones.  Design of Weiss pieces is somewhat traditional and the name is well known and highly regarded for its figural jewelry.  Of particular beauty are those pieces in the form of butterflies and other insects.  Without a doubt, Weiss created some of the most beautiful and appealing jewelry of the post-WWI era.

In recent years, there have been issues with fake and reproduction Weiss pieces.  So far, they are easy enough to identify as the quality and fit and finish are poor.

EISENBERG

Founded in Chicago in 1914 by Jonas Eisenberg, the company produced high quality ready-to-wear clothing and accessories.  The jeweled accessories were made using the highest quality Austrian rhinestones provided by the Swarovsky Company.

Jewelry production began in the 1930's and continues to this day under the Eisenberg name.  Clothing production was halted in 1958.

Vintage Eisenberg jewelry is highly prized for its elegant design and quality materials.  It is easily identified by its superior workmanship and the use of the very best shimmering stones.  Eisenberg cannot be mistaken for anything else.

HOLLYCRAFT

Part of a Hollycraft Pin & Earrings Set
Founded in the 1940's by an Armenian immigrant, this firm was in business making fine costume jewelry until the late 1960's. Hollycraft jewelry is among the top names in exquisite design and high quality workmanship. Typically, the Hollycraft lines were made with pastel colored enclosed stones with a japanned back. Pieces with red stones are quite rare.


TRIFARI
Trifari Faux Pearl Brooch

The history of this company can be traced back to the mid-1800's in Naples, Italy and to a small workshop owned by Luigi Trifari.  Luigi's grandson, Gustavo Trifari, learned the jewelry making trade from his grandfather before emigrating to America in 1904 at which time he founded his own jewelry company.  Two years later, Trifari was producing beautiful rhinestone decorated hair ornaments and accessories and later became one of the largest and best-known producers of costume jewelry.  They manufactured a wide range of designs and quality pieces available at various price levels.  Trifari jewelry is recognized by collectors for its superb design and workmanship.  Early pieces marked KTF and figural pieces are particularly highly valued.


© 2013 Big River Mercantile

Brief History of Dugan Glass, Its Relationship to Northwood Glass And Its Contributions to the American Carnival Glass Era

Dugan Glass, operating under that name only from 1904 to 1909 was in many ways a version of the related company, Northwood Glass. At one time or another, company principals and members of both the Northwood and Dugan families were involved in some combination of cooperation in the formation and operations of both companies. The Northwood and Dugan Glass companies could trace their common heritage back to the Hobbs-Bruckunier plant for which both Harry Northwood and Thomas Dugan worked as glass etchers.1

5 Hearts Footed Bowl in Marigold

Late 19th Century America was actively engaged in establishing its own glass industry, and this was mostly accomplished by importing European and English glass artisans to work in American factories. The principals of what would become the Northwood Glass Co. and Dugan Glass, Harry Northwood and Thomas Dugan were cousins who lived, trained and became glass-making masters in the same region of England. At the urging of friends already living in the U.S., and motivated by the potential for becoming wealthy, they emigrated to America within a year of each other and right away found lucrative work in the glass industry. Northwood briefly worked for the National Glass Co., and Dugan for Hobbs Bruckmier of Wheeling W. Va.

In 1896, Harry Northwood and Samuel Dugan (Thomas' father) formed Northwood Glass Co., the first of four factories that would bear the Northwood name (the last plant closed in 1925, seven years after Harry's death). Thomas Dugan and his sons all worked for Northwood at one time or another before setting out on other pursuits.

Dugan Opalescent Honeycomb Bowl
From 1900 to 1903, the Northwood Glass Company founded by Harry was taken over by Thomas who changed the name to National Glass Co. This venture was operated jointly by Harry Barstow and Thomas A. Dugan. In 1904, under Thomas' sole management, the name changed again to Dugan Glass Co., and a 'Diamond D' glass mark was introduced which appeared on just a few of the pieces being produced (mostly on the company's carnival glass). In 1913, due to another significant management change, Dugan Glass became The Diamond Glass Co., a name it would carry until its demise by fire in 1931.

Northwood Glass and Dugan Glass were well known for their popular iridized carnival glass, a process Harry had learned in England. Although 1908 is the year most frequently considered as the beginning of carnival glass production, and though Northwood Glass produced its own line of carnival from 1908 into the 1920's, journals from the time give a strong indication that Thomas Dugan was experimenting with the process as early as 1902 and his company, Dugan Glass began marketing their own carnival glass in 1905, making it the actual first company to mass produce it.

In a somewhat specious approach to marketing, Dugan Glass purported to make glass of such quality as to compete with Webb and Loetz. However, even though it was clearly nothing like the quality of the glass it sought to emulate, truth in advertising was not a principle to which companies strongly adhered in the late 19th Century. For example, surviving Dugan company brochures for vases advertised their glass as '...exact reproductions of expensive imported vases....'. Further, items listed in their catalogs were often described as 'Japanese', 'Pompeian', or 'Venetian' in order to give their glass the cachet of fine European crystal. Interestingly, catalogs from one year to the next revealed the inconsistency of these claims, as items previously shown as 'Japanese' for example in the 1905 catalog, were called 'Pompeian' in the 1906 catalog. Clearly, the terms were relative and used only for their perceptive value for implying European or Asian origins.

Because of the various permutations in the relationships between family members, managers and owners, the Northwood Glass, Dugan Glass and later the Diamond Glass companies are tightly woven together in the tapestry of late 19th and early 20th Century American glass-making history. Each man had worked for one or been a venture partner in one or the other of the companies. This is particularly true for cousins Northwood and Dugan as they shared processes and worked so closely together that even molds between their factories were often the same. For that reason, it can be easy for collectors today to mistake a piece of Dugan for Northwood and the other way around. One clue when viewing a piece from that time is to look for a Northwood Glass mark. Almost all Northwood had a mark, but early Dugan, almost never. Only after 1913, when Dugan Glass became the Diamond Glass Company, did most pieces bear the 'Diamond D' mark. Further, because there was a major change in the company's management right in the middle of the carnival glass production era, Thomas Dugan's influence in respect to design and quality control was evident for just a portion of the company's output. The glass produced under his management from 1909 to 1913 was substantially different in pattern design, color and iridescent quality from that made during the 1913 to 1931 period, making Diamond Glass pieces much easier to discern from Dugan Glass items. However, the Dugan era glass is considered to be of better iridescence and design quality.

Dugan Glass, Fenton Glass, and Northwood Glass were among the big players in late 19th Century glass production. But it was Harry Northwood and Thomas Dugan and Dugan's sons that brought true artistry and stable processing methods to the American Glass Industry. Thomas Dugan's story is particularly compelling and his early 1902 contributions alone can arguably be considered the true beginning of the carnival glass period in America.


1Dugan & Diamond Carnival Glass, Carl O. Burns, copyright 1999, Collector Books

© David Simons, January 2012

Identifying Alaskan/Northwest Native Artwork


For centuries Northwest Coast Native people (those inhabiting the coasts of Alaska, Washington, Oregon, Northern California and British Columbia, Canada) measured their world organically and led an existence as fishermen, hunters and subsistence dwellers. By taking their subject matter directly from the natural world within which they lived, these folks created hauntingly beautiful and distinctive carvings, woven works and paintings. Using only the natural grasses, spruce roots, and cedar bark around them, the women wove intricately designed and crafted baskets of every imaginable size and for every imaginable purpose. Some were brightly colored and used for trade while others were constructed more plainly for day to day use. From the hunt or scavenged on the beaches, the men used walrus ivory and whale baleen which they carved into jewelry and sculptures, often hand-decorated with inlays of various types. Scrimshaw was an advanced art form in this culture.

While technically a form of folk art, fine workmanship and the artisans’ commanding ability to capture the natural movement and pose of their subjects, in truth, places these craftsmen and women among the most accomplished artists and sculptors in the world. Late 19th and early 20th Century Tlingit spruceroot basketry is an example of an art form unrivaled anywhere in the world for its unique design elements and construction. Unique to the decorative aspects of these baskets was the Tlingit weaver’s use of false embroidery, a method by which the colored design was raised on the exterior wall of the basket but could not be seen on the inside wall. It is breathtaking to see such a basket created by a master weaver.
Purse Made with Loon Feathers


Understandably, vintage walrus ivory jewelry, carvings and basketry created by Northwest Coastal people is prized and highly sought by collectors and the values continue to go up dramatically over time. 

An unfortunate fact of life in today’s environment are those who try, and sometimes succeed, in deceptively reproducing Native Alaskan and Northwest Coast artwork; many pieces have come into the market represented to be authentic which are not. The purpose of this article is to offer insight into the characteristics one should look for in order to help ascertain authenticity. Whether adding to your own private collection or acquiring these types of crafted articles for resale, it’s important to be aware that fakes do exist and that some basic specific knowledge should be sought before making any major purchases.

A few years back, so-called Alaskan native ivory carvings were found for sale in gift shops and souvenir stores along the cruise ship routes in Alaska. They were represented as authentic Alaskan Native artwork but upon investigation were shown to have actually been manufactured in Bali, legally exported to the U.S. with paper tags stating the items to be of Balinese origin. These tags had been removed and the item put on the shelf for sale as Alaskan art. 

In some cases the craftsmanship in a fake can be excellent (but still not as good as the original) and differences in style can be difficult for the unpracticed eye to discern. To further complicate matters, an artificial resin material made to emulate the striations and color of one of the popular types of walrus ivory has been used, making it even harder to identify these fakes.
Beautiful Turn of the Century
Attu Basket


How does one know that a ‘vintage’ Alaskan or Northwest Coastal item is genuine? While provenance can be the best and most reliable method of identifying many types of genuine art, it is problematic here as written records for 19th Century to mid-20th Century Native work are hard to come by. These are and were verbal cultures whose histories have been handed down mostly in stories, songs and artifacts and the origins of works of art are rarely backed up in writing. Further, up until about mid 20th century, carvers rarely signed their work. Basketry is hardly ever signed even to this day. 

What’s left is to either understand and be able to identify the work stylistically or to buy it from a knowledgeable and reputable seller who will stand behind his or her guarantee of authenticity. There is considerable written resource available, with Native American basketry, in particular, being the subject of a number of highly regarded works. Also, if traveling in an area typically rich in these artforms take the time to visit the workshops of any contemporary native artists that are open to the public. Many will have a wealth of knowledge to share, if you but ask the questions, and some contemporary artists still use the same process and tools as their forebears, as well. Visiting local museums where aged examples might be displayed is also recommended. 

While not comprehensive, there are some basic ‘rules of thumb’ that should be applied when contemplating the purchase of Native work.

First, there is almost no significant artwork available for retail sale that dates earlier than about the 1880’s. Earlier pieces of interest are usually in museums or private collections.
Eskimo Made Kayak Hunter
c. 1960


Second, work from the last quarter of the 19th century until about 1972 was unsigned. The early 1970’s marked the passage of the Marine Mammal Act that prohibited general trade in ivory but specifically exempted Alaskan Native carvers from its provisions. This pretty much assured that all Alaskan Native produced ivory art was signed as a protection to the carver after this law was enacted. 

Pre-1970’s unsigned ivory art is distinctive in style and subject and is generally of very high artistic quality. A hallmark of Northwest Coast Native carvers’ work is their preference for depicting their animals ‘frozen’ in motion and they were true masters at capturing that in their work. A genuine piece will be efficiently wrought with relatively few strokes and yet the subject will have that flowing look to it that one can easily put in motion with the mind’s eye. Facial expression and other subtle details will be minimalist at best as the artist’s interest is not in the details but in the movement. This is the aspect of an animal that struck the subsistence-based artisan as beautiful and what he strove to express in its highest form. 

To some extent, an indicator of age for ivory pieces can be estimated by examination of the material. There are three basic forms of ivory identifiable by coloration. New ivory is recently harvested and is a gleaming white color. Old ivory, which was frequently collected along the beaches, usually displays tan or brown coloring from its exposure to the elements. And finally, fossilized ivory is often very dark as a result of having been buried for years in the permafrost. Much of the old carved jewelry was made with fossilized ivory.

About 1974 the Alaska Native Arts & Crafts Co-op (ANAC) was formed in Anchorage for the express purpose of adding legitimacy to the aboriginal art and to serve as a symbol of authenticity for Alaskan Native arts and crafts. Items sold through the co-op carried a special tag as certification that it was of genuine Native Alaskan origin. Vintage pieces sold today will frequently still have this tag attached.
Tlingit Cedar Root Basket
With False Embroidery c. 1900

As the commercialization of Native arts has grown, the quantity of art carvings has increased while the quality has decreased. Early artists focused on the expression of the piece. Contemporary artisans for the most part reproduce similar stylized examples but which are designed to appeal to a much wider tourist and non-Native audience. This work is fairly easy to identify because it is usually made with new ivory and displays little or no coloration. Further, few contemporary pieces have the quality of artistry attributed to older work. While new pieces are occasionally represented by unethical vendors as being vintage, most pieces are sold in gift shops and online and the vendors are truthful about their age and origin. Online auction venues tend to have more problems with truthful representations than other outlets. 

As with all antiques and collectibles, the best protection against being victimized by a fraudulent deal is to either be personally knowledgeable about the characteristics of genuine work or to buy from a known legitimate and honorable vendor who is knowledgeable and has a track record of trouble-free sales. A reputable dealer will always be willing to stand behind his sales and can be trusted to make honest representations as to the origins of his pieces.


© David Simons, July 2006
Here are links to Native Alaskan items we currently are offering in our Etsy shop.
Eskimo Grass Basket
Child's Caribou Skin Mask,
Miniature Alaskan Eskimo Mask

Using Micro Mesh Abrasives in Finish Application or Restoration


Micro-Mesh abrasives can polish to a high reflective state or leave a matte or satin finish depending upon where you stop while using the series.

1. Bare Woods


Before starting the Micro-Mesh series, coarse sanding should be done using up to 320 grit sandpaper. Shaping, sawing or turning of the work piece should be complete.
Begin with 1500 Micro-Mesh, sand unit all of the common sandpaper scratches are removed. Continue with the Micro-Mesh series ( 1800, 2400, 3200, 3600, 4000, 6000, 8000, 12000) You may stop at any point during this process when you have reached the finish that you desire.
Thinned lemon oil or Danish oil can be used on bare wood.


2. Wood Finishes (polyurethane, polyester, epoxy, lacquer, etc.)


*Follow the manufacturer's recommended cure times prior to recoating or applying the finish coat. When you are applying multiple coats, sand from 1500 MICRO-MESH to 3200 or 3600 between coats to remove any orange-peel or dirt.
After the final coat has fully cured, polish the surface beginning with 2400 MICRO-MESH and continue through the series (3200-12000) until the desired gloss is achieved.
Satin finishes are achieved with the 3600 grade. The satin finish gets progressively higher in gloss through the 6000 step. High gloss finishes will appear by the 6000 through 12000 step. The wood, the finish used and personal preference determine where to stop. MICRO-GLOSS liquid abrasive can be hand rubbed onto the finish following the 12000 MICRO-MESH step for an "ultra" high gloss finish.
Micro-Mesh replaces steel wool and both pumice and rotten stone for final finishing.


3. Repair of Wood Finishes


Burn ins - Sand to remove discoloration. Cover with three coats of lacquer. Wet sand with 1500, then apply one more coat of lacquer. Polish with Micro-Mesh series beginning with 2400 MICRO-MESH and continue on thru the series stopping after each grade to see if you've reached the finish you're trying to match.
Guidelines for matching a satin finish - Begin with 1800 MICRO-MESH , followed by 3600, and continue on thru the series stopping after each grade to see if you've reached the finish you're trying to match.

4. Hints


Micro-Mesh can be used wet or dry. When using Micro-Mesh dry, it can be "unloaded" by rapping against the palm of your hand.
Micro-Mesh can also be cleaned by using a stiff, short bristled brush.
Thinned lemon oil or Danish oil can be used on bare wood.


Sunday, September 15, 2013

Stunning Vintage Hobe Brooch


The Strange Story of John Meck As A Young Man

No one in his Chicago circle of friends and family understood John Meck very well.  Classic education, good grades in school, participation in inter and intra-mural sports were all expectations for boys in the 1920's who were thought to be headed toward a life of success. Although he struggled throughout his school career, was something of a loner (we would call him a 'geek' today), and did not distinguish himself in sports, John still managed, to the relief of his parents, to earn good enough grades to be accepted at Northwestern University.

Growing up in Glencoe, Illinois, John's life was that of the privileged upper middle class.  The Mecks were a model 1920's family as his father, a professor by education and background, was the school principal and his mother managed the family's active social life.  There is no evidence that John was anything but a typical and normal teenager, perhaps a bit more taken with the new gadgets and technology that were emerging during the 1920's, but otherwise just another smart, growing boy.

So in the fall of 1925, off he went to Northwestern, living on campus and pursuing his Freshman studies. Or so it was thought.  Sometime after December 1, 1925, John Meck disappeared from school. Neither his friends nor family heard from him after he left.  One college classmate recalled him saying something like he 'was dissatisfied with being a student and wanted to learn the radio business'.1

Mirror Tone Mod 850 Deluxe mfg 1947
Meck Industries
The amplifying vacuum tube had just been developed by the early 1920's and this new technology revolutionized the radio industry.  Companies were springing up all over the place manufacturing consumer radios for the burgeoning broadcast business.  In mid-summer 1920, AM type broadcasting began in Argentina.  Shortly thereafter, the first known radio news program in the U.S. was broadcast by station 8MK (the unlicensed predecessor of WWJ in Detroit). In November of 1920, station KDKA of Pittsburg was the first to broadcast election results (Warren Harding won). In 1921, the first commercial station, WBZ of Springfield, Massachusetts was licensed and by 1925, when Meck left school, there were more than 600 commercial radio stations and home radios were being manufactured and sold everywhere.2

In this exciting time of new technologies and industries, where in the world was John Meck?

His parents were so concerned after John mysteriously dropped out of sight (and college) that his mother reported him missing to the Evanston, Illinois police and commissioned a wanted poster offering a $200 reward for information of her son's whereabouts. There is no record as to whether or not anyone collected.

Finally, in April, 1926, after circulating fliers about her son around the area radio shops and factories, John's mother located him working in a radio store on Dearborn St. Again, he explained that he wanted to learn the radio business, not the classics or the law or any other liberal arts that his parents foresaw him doing.  In return for him returning home, his parents agreed that he could get his education wherever he wanted. 

Late 1940's Meck Radio Ad
No one knows where or if John Meck completed college.  No more is known of him until just prior to World War II when he founded Meck Industries in Plymouth, Indiana.  The company began business by manufacturing phonographs and public address systems.  During the war, it expanded into making quartz crystals for military radios and other electric devices for the War Department. After the war, the company produced radios carrying names like Deluxe, Lee, Mirror Tone, Trail Blazer and Plymouth. In 1949, they made and marketed their first home 7 inch and 10 inch TV receiving sets. The business continued on making radios and TV's, and even acquired another company, until 1956, when it closed.


To this day, no one knows for sure where Meck went to school.  Some speculate maybe Notre Dame, for why else would he have chosen Indiana for the location of his business? Meck's radios are not common finds since the company was never a real economic force in the radio boom during the post-War years.  But what the company produced was elegantly designed and made with high quality components.  Owning one today is a true collectible reflecting the innovative entrepreneurial spirit of John Meck


FOOTNOTES

1. The Mystery of John Meck, Glencoe Historical Society web article, June 10, 2010.

2. The History of Radio, Wikipedia


© David Simons, Sep 2013

Here is a link to one of the Meck Industries radios recently restored and is available for sale in our shop.